Hey there! If you’re looking to install a keyboard tray, you’ve come to the right place. Our step-by-step guide is here to help you tackle this task with ease. We understand that having a keyboard tray can greatly improve your ergonomic setup and make your work or gaming experience more comfortable. So, let us walk you through the process, ensuring that you can set up your keyboard tray without any hassle.
Top Picks for Ergonomic Keyboard Trays


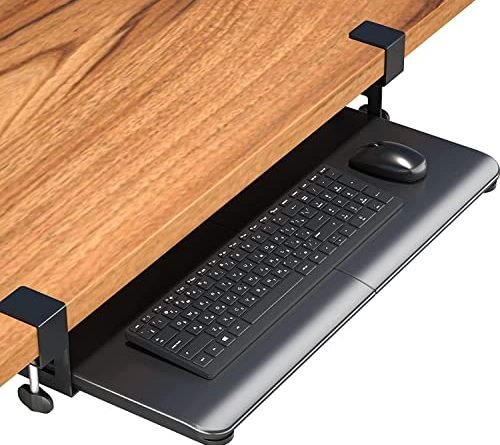
Installing the MI-7149 Full Motion Under Desk Keyboard Tray
Gather the necessary tools and materials
Before you get started, it’s important to gather all the necessary tools and materials. Here’s a list of what you’ll need:
- Screwdriver: This will be essential for securing screws and fastening the parts together. Make sure you have a screwdriver that is suitable for the types of screws included in your keyboard tray kit.
- Measuring tape: You’ll need a measuring tape to ensure accurate placement and alignment of the keyboard tray. Measure the width and depth of your desk to determine the ideal position for the tray.
- Pencil: Use a pencil to mark the spots where you’ll be drilling or attaching screws. These marks will serve as reference points to help you install the tray correctly.
- Level: A level is crucial for ensuring that the tray is perfectly horizontal. This will help prevent any discomfort while using the keyboard and ensure a professional-looking installation.
- Keyboard tray kit: Of course, you’ll need the actual keyboard tray kit itself. Make sure you have all the components included in the package, such as the tray, mounting brackets, screws, and any additional parts mentioned in the instructions.
Once you have all these tools and materials ready, you’ll be fully equipped to begin installing your keyboard tray. Remember to refer to the specific instructions provided with your kit for the most accurate and detailed guidance.


Measure and mark the installation area
To measure and mark the installation area for your keyboard tray, follow these steps:
- Grab a measuring tape and determine the ideal placement for your keyboard tray. Consider factors such as your preferred ergonomic position and accessibility.
- Measure the width of your desk or the area where you plan to install the tray. This will help you determine the appropriate size of the tray and ensure a proper fit.
- Decide on the height at which you want the tray to be installed. Measure the distance from the underside of your desk to the desired height. This will help you position the tray at the right level for comfortable use.
- Once you have determined the ideal placement, mark the positions where the mounting brackets will be installed. Use a pencil or marker to make clear and visible marks on the underside of your desk.
- Make sure the marks are aligned properly and evenly spaced. Double-check your measurements to ensure accuracy before proceeding with the installation.
By following these steps and marking the installation area accurately, you can ensure a smooth and successful installation of your keyboard tray.
Mount the brackets
To attach the mounting brackets to the underside of your desk or table, follow these steps:
- Start by gathering the necessary tools and materials: the mounting brackets and the screws provided in the kit.
- Position the brackets in the desired location on the underside of the desk or table. It’s best to place them near the corners for stability.
- Using a screwdriver or a drill, begin by inserting one of the screws into the pre-drilled holes on the bracket. Make sure the screw is aligned with the corresponding hole on the desk or table.
- Tighten the screw by turning it clockwise until it is securely fastened. Be careful not to overtighten, as this may damage the bracket or the desk/table surface.
- Repeat steps 3 and 4 for each of the remaining screws, ensuring that all brackets are securely attached.
- Once all the screws are in place, give each one a final check to ensure they are tight and the brackets are firmly attached to the desk or table.
By following these simple instructions, you can easily attach the mounting brackets to the underside of your desk or table, providing a secure foundation for your installation.
Attach the keyboard tray
To attach the keyboard tray, follow these simple steps:
- Slide the keyboard tray onto the mounted brackets.
- Position the tray so that the brackets fit into the designated slots.
- Make sure the brackets are securely inserted into the slots.
- Ensure proper alignment and levelness.
- Align the tray so that it is centered and straight.
- Use a level to double-check that the tray is perfectly level.
- Place the level on the tray surface and adjust if necessary.
Remember to take your time and be cautious while performing these steps to ensure a secure and stable attachment.
Secure the tray
Secure the tray by tightening any screws or locking mechanisms to firmly hold it in position. Apply gentle pressure on the tray to test its stability. If the tray moves or feels loose, continue tightening the screws or locking mechanisms until it is secure. Make sure all the screws are tightened evenly to distribute the weight evenly on the tray. Once you have secured the tray, you can confidently use it for its intended purpose without any worries of it coming loose.
Adjust and test
- Start by loosening the screws or knobs located on the underside of the keyboard tray. Depending on your model, you may need a screwdriver or simply twist the knobs counterclockwise.
- Once the screws or knobs are loose, gently lift or lower the keyboard tray to your preferred height. Keep in mind that a comfortable position is one where your arms and wrists are in a relaxed and neutral position.
- After adjusting the height, you can also tilt the keyboard tray if desired. Look for a lever or adjustment mechanism that allows you to change the angle. Move it to the left or right to tilt the tray forwards or backwards.
Test its functionality by using your keyboard and mouse
- Sit in your usual position and place your hands on the keyboard and mouse. Ensure that your arms are bent at a comfortable angle and your wrists are not strained.
- Type a few sentences on the keyboard while paying attention to your comfort and ease of typing. If you notice any discomfort, make further adjustments to the height or tilt until you find the optimal position.
- Similarly, use the mouse to navigate on your computer screen. Check if you can move the mouse smoothly and without any strain on your wrists or hand.
- If everything feels comfortable and functional, tighten the screws or knobs underneath the keyboard tray to secure it in place. Double-check that it remains stable and doesn’t wobble during use.
Remember, the goal is to find a position that minimizes strain and promotes a healthy posture while using your keyboard and mouse. Regularly reassess your setup and make further adjustments if needed to ensure optimal comfort and productivity.
Final Thoughts
In conclusion, installing a keyboard tray is an easy task that can greatly enhance your workspace ergonomics. By following the steps outlined in this guide, you will be able to gather the tools needed, measure and mark the installation area, mount the brackets, attach the tray, secure it firmly, and adjust it to your liking. Once installed, you can enjoy the many benefits of having a comfortable and ergonomic setup. So go ahead and give it a try, and start typing away with ease and comfort!
What you’ll need


Make Your Workspace More Comfortable
Navigating Your Workspace Efficiently with a Keyboard Tray
- Adjust the height: Start by setting the keyboard tray at a height that is comfortable for you. Ensure that your arms and wrists are in a neutral position, not strained or bent
- Install the tray correctly: Make sure the keyboard tray is securely attached to your desk or workspace. Follow the manufacturer’s instructions for proper installation
- Position the keyboard: Place your keyboard on the tray, making sure it is centered and aligned with your body. This will help you maintain a good typing position and reduce strain on your wrists
- Use wrist support: Consider using a wrist rest or ergonomic keyboard to provide support and cushioning for your wrists. This can help prevent discomfort and repetitive strain injuries
- Take breaks and stretch: Remember to take breaks from typing and stretch your hands, wrists, and fingers. This will help prevent fatigue and maintain good hand health
Got Questions About Keyboard Trays? We’ve Got Answers!
What are the advantages of using a keyboard tray?
Using a keyboard tray can have several advantages. First, it helps to promote proper ergonomics by allowing you to position your keyboard at a comfortable height and angle. This can help reduce strain on your wrists, arms, and shoulders, preventing issues like carpal tunnel syndrome.
Second, a keyboard tray can help optimize your workspace. By mounting the keyboard under your desk, it frees up valuable desktop area, allowing you to have more space for other tasks or equipment. This can be particularly useful if you have a small desk or if you like to keep your workspace organized.
Additionally, a keyboard tray can improve your overall posture. By positioning the keyboard at the correct height and angle, it encourages you to sit with proper alignment, reducing the risk of back and neck pain.
Lastly, a keyboard tray can be easily adjustable, allowing you to customize it according to your needs. You can easily raise or lower the tray, tilt it, or slide it in and out, providing you with a comfortable and personalized typing experience.
Overall, using a keyboard tray can help improve your comfort, productivity, and overall well-being while working at your desk.